How to Add Organization and Article Schema for E-E-A-T
By Joe Della Mora, Founder, GroundScore
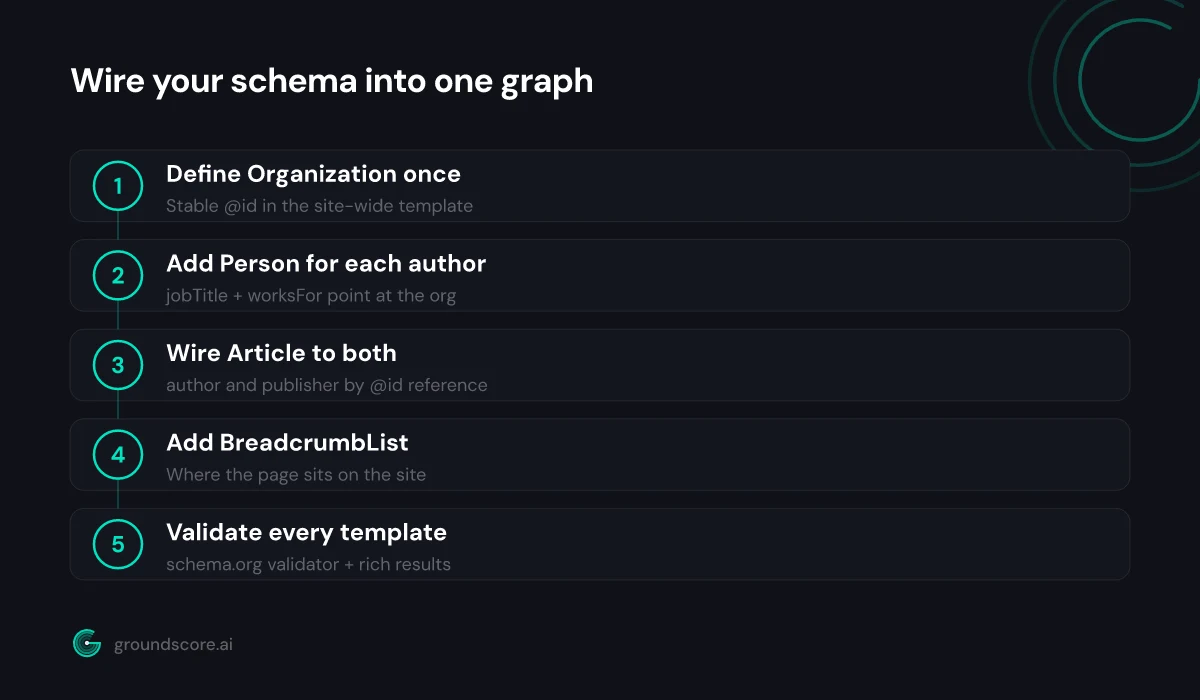
E-E-A-T — experience, expertise, authoritativeness, trust — is usually treated as a content problem. For AI search it is also a markup problem, and Organization schema is where E-E-A-T becomes machine-readable. An AI engine deciding whether to cite you needs answers to basic identity questions: who publishes this site, who wrote this page, and are those entities real? Most schema guides show each type in isolation. The part that actually matters for attribution — wiring Organization, Person, and Article together with @id references so they form one connected graph — is the step those guides skip, and it is the focus here. You need edit access to your site templates, the ability to paste and edit JSON-LD, and roughly 60 to 90 minutes. Five steps: define your Organization once, mark up your authors, wire Article schema to both, add breadcrumbs, then validate.
Step 1: Define your Organization schema once
Direct answer: Create one Organization block with a stable @id, your brand name, url, logo, and sameAs links to your real public profiles. Publish it site-wide, usually in the header or footer template, so every page references the same identity instead of redefining it slightly differently on each URL.
The @id property is the piece most implementations miss. It is a URL-shaped identifier — it does not need to resolve to a live page, but it must never change — and it is the anchor that every other schema block on your site will point at. Without it, each page declares its own anonymous publisher and nothing connects.
{
  "@context": "https://schema.org",
  "@type": "Organization",
  "@id": "https://www.example.com/#org",
  "name": "Example Plumbing Co",
  "url": "https://www.example.com/",
  "logo": "https://www.example.com/images/logo.png",
  "sameAs": [
    "https://www.linkedin.com/company/example-plumbing",
    "https://www.facebook.com/exampleplumbing"
  ]
}
Three rules keep this block honest. First, the name must match how your business is written everywhere else — your footer, your Google Business Profile, your invoices. Entity consistency is a trust signal, and a schema name that differs from your visible branding works against you. Second, sameAs should list only profiles you actually control and keep current. Two real profiles beat eight abandoned ones. Third, put the block in your site-wide layout, not on individual pages, so there is exactly one source of truth.
Building GroundScore, the pattern I keep seeing when we scan sites is the inverse of this setup: Article markup exists on the blog, the author is a bare text string, and there is no Organization block anywhere. The engine is being asked to trust an article from a publisher that, in machine-readable terms, does not exist. Fixing that costs one template edit.
If you are a local business with a physical location, use LocalBusiness instead of Organization — it inherits everything above and adds address and geo properties. The wiring in the next steps stays identical.
Step 2: Add Person schema for your authors
Direct answer: Mark up each author as a Person with name, url, jobTitle, and worksFor pointing at your Organization @id. Give every author a stable @id of their own, usually anchored to an author or about page, so articles can reference the person rather than repeating a bare name string.
Expertise is claimed by people, not domains. When your articles name an author who is also a machine-readable Person — with a job title, an employer, and a page that describes them — an engine can connect the byline to a real entity. When the author is just the string "Admin", that chain breaks at the first link.
{
  "@context": "https://schema.org",
  "@type": "Person",
  "@id": "https://www.example.com/about#jane-doe",
  "name": "Jane Doe",
  "url": "https://www.example.com/about",
  "jobTitle": "Master Plumber",
  "worksFor": { "@id": "https://www.example.com/#org" }
}
Notice what worksFor does: it does not repeat the organization's name, logo, and url. It points at the @id you defined in step 1. That reference is the whole trick this guide is built around — the person is now provably connected to the publisher, and any engine parsing the page can walk from article to author to organization without guessing.
Anchor the Person @id to a page that actually says something about the author. An about page with a short bio, credentials, and a photo is enough. If you have several authors, a simple team page with one section per person works — each section becomes the natural anchor for that person's @id. The jobTitle should be a real title, not a keyword. "Master Plumber" tells an engine why this person is qualified to write about water heaters; "SEO Content Specialist" tells it the opposite.
One author is fine. Most small-business sites have exactly one credible voice — the owner. That is not a weakness. A single well-marked-up expert beats a roster of invented contributors, and inventing contributors is precisely the kind of signal you do not want to send.
Step 3: Wire Article schema to both
Direct answer: On each post, add Article schema whose author property references your Person @id and whose publisher references your Organization @id. This turns three isolated blocks into one connected graph: the article names its writer, the writer works for the publisher, and every attribution claim is checkable by machine.
This is the step where the earlier work pays off. The Article block itself is short, because it delegates identity to the blocks you already defined:
{
  "@context": "https://schema.org",
  "@type": "Article",
  "headline": "How Often Should You Flush a Water Heater?",
  "author": { "@id": "https://www.example.com/about#jane-doe" },
  "publisher": { "@id": "https://www.example.com/#org" },
  "datePublished": "2026-05-14",
  "dateModified": "2026-06-01",
  "mainEntityOfPage": "https://www.example.com/blog/flush-water-heater"
}
Set headline to the actual page title, keep datePublished honest, and update dateModified only when the content genuinely changes — engines treat freshness as a signal, and faking it with rolling dates is both detectable and pointless. The mainEntityOfPage property ties the markup to the canonical URL, which matters on sites where the same content is reachable at more than one address.
Here is how the three types divide the work:
| Schema type | Identity question it answers | Key properties |
|---|---|---|
| Organization | Who publishes this site? | name, url, logo, sameAs |
| Person | Who wrote this page, and why trust them? | name, jobTitle, worksFor |
| Article | What is this content and whose is it? | headline, author, publisher, dates |
| BreadcrumbList | Where does this page sit on the site? | itemListElement, position |
If your posts are how-to guides or FAQ pages, Article can coexist with HowTo or FAQPage markup on the same URL — the types describe different aspects of the same page. The trade-offs between those content types are covered in FAQ schema vs HowTo schema vs Article schema; the identity wiring in this guide stays the same regardless of which you pick.
Step 4: Add BreadcrumbList for context
Direct answer: Add BreadcrumbList markup listing the path from your homepage to the current page, one ListItem per level with position, name, and item URL. It gives AI engines structural context — this article belongs to this section of this site — which reinforces the link between content and publisher.
Breadcrumbs are the least glamorous part of the graph and the fastest to implement. Most CMS themes and SEO plugins can emit them automatically; if yours does, turn the feature on and skip to validation. If you are adding them by hand, the shape is:
{
  "@context": "https://schema.org",
  "@type": "BreadcrumbList",
  "itemListElement": [
    { "@type": "ListItem", "position": 1, "name": "Home", "item": "https://www.example.com/" },
    { "@type": "ListItem", "position": 2, "name": "Blog", "item": "https://www.example.com/blog/" },
    { "@type": "ListItem", "position": 3, "name": "How Often Should You Flush a Water Heater?" }
  ]
}
The last item — the current page — takes a name but no item URL. Positions start at 1 and must be sequential. That is the entire spec surface you need.
Why bother? Because retrieval systems work with passages, not whole sites. When an engine pulls a paragraph from your article, breadcrumb markup is one of the cheapest ways to tell it what neighborhood that paragraph lives in: a plumbing company's maintenance guide, not an orphaned page floating at a random URL. Structural context compounds with the identity work from steps 1 through 3 — the passage has an author, the author has an employer, and the page has an address inside a coherent site.
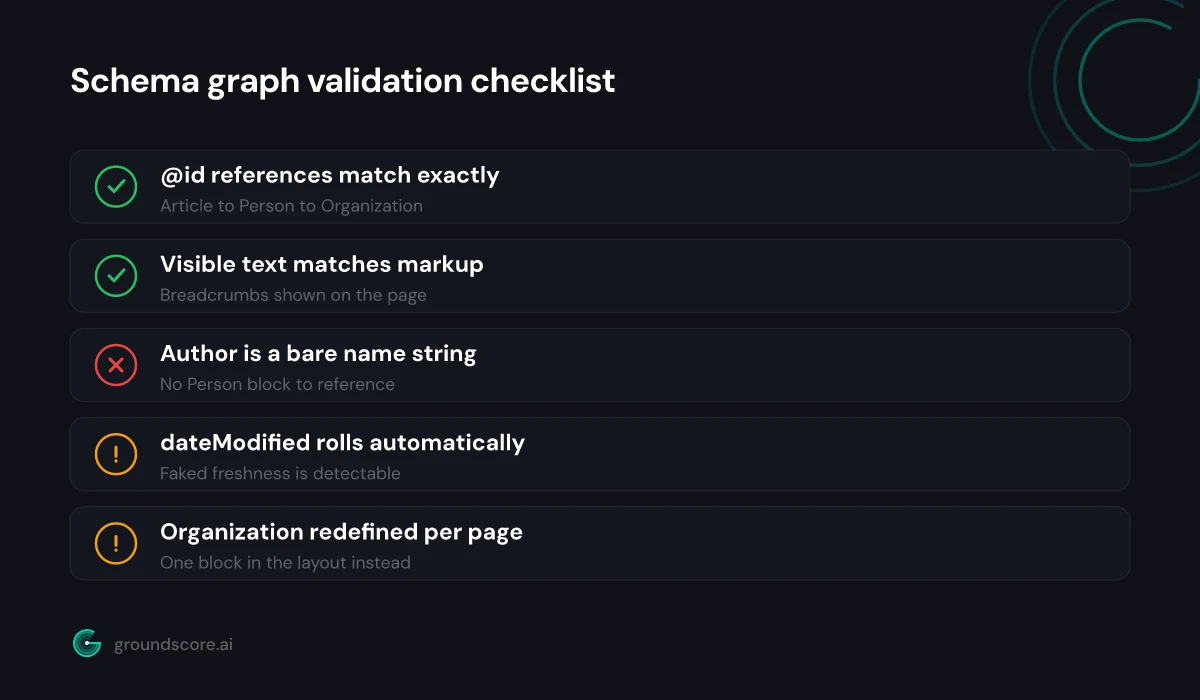
Keep the visible breadcrumb trail on the page in sync with the markup. A breadcrumb trail that exists only in JSON-LD, describing navigation the user cannot see, is the kind of mismatch validators tolerate but trust evaluations should not. If the page shows Home, then Blog, then the post title, the markup should say exactly that.
Step 5: Validate and keep it in sync
Direct answer: Run every distinct page type through the schema.org validator and Google's rich results test, fix errors before warnings, and re-validate after template changes. Then treat markup as part of publishing: new authors get Person blocks, moved pages get updated breadcrumbs, and the Organization block never forks.
Validate one example of each template, not every URL: your homepage, one blog post, one service page, your about page. The schema.org validator checks structural correctness — malformed JSON, unknown properties, broken nesting. The rich results test checks eligibility for Google's enhanced displays. They catch different problems, so run both.
The failure mode to hunt for is a broken reference. If your Article points at an author @id that no page defines, or your Person block references an Organization @id with a typo in it, each block validates fine in isolation while the graph silently falls apart. Check the references by hand: copy the @id from the Article's author property and confirm a Person block with that exact string exists. Character-for-character — trailing slashes and http versus https both break the match.
After validation, the remaining work is maintenance discipline. Three habits cover it:
- When someone new starts writing for the site, add their Person block the same day their first post goes live.
- When a page moves or a section is renamed, update the breadcrumb markup with it.
- When the business rebrands, changes its logo, or gains a new profile worth listing in sameAs, edit the Organization block in one place — which is exactly why step 1 put it in the site-wide template.
Markup that drifts out of sync with reality is worse than none, because it teaches engines that your machine-readable claims cannot be trusted. Fifteen minutes a month keeps the graph honest.
Frequently asked questions
Does schema markup directly improve E-E-A-T?
Schema does not manufacture expertise, but it makes real expertise legible to machines. E-E-A-T signals only count if systems can connect your content to a credible author and publisher. Organization, Person, and Article markup build that connection explicitly, so the trust you have already earned stops being invisible to AI engines.
Do I need Organization schema on every page?
Yes, and the easiest way is to put it in your site-wide layout template so it ships automatically. Every page then carries the same publisher identity, and any Article or Person block can reference the shared @id. Defining the organization differently across pages fragments your entity and weakens the signal.
What is the difference between Organization and LocalBusiness schema?
LocalBusiness is a subtype of Organization for businesses with a physical location or service area. It supports everything Organization does, plus address, geo coordinates, and opening hours. If customers visit you or you serve a defined area, use LocalBusiness; if you are online-only, plain Organization is the right choice.
Where does the JSON-LD actually go on the page?
Inside a script tag with type application/ld+json, placed in the head or body of the HTML. Most CMS platforms let you add it through the theme layout, an SEO plugin, or a custom field. Location on the page does not affect parsing; consistency across pages is what matters.
Can an article have multiple authors?
Yes. The author property accepts an array, so list one Person reference per contributor and give each their own @id anchored to an author or about page. Only credit people who genuinely worked on the piece — padding bylines with invented contributors undermines the trust the markup is supposed to build.
How long until AI engines pick up schema changes?
There is no fixed timetable. Changes become visible to an engine the next time its crawler fetches the page, which can range from days to weeks depending on how often your site is crawled. Validate immediately after publishing so the markup is correct whenever that next fetch happens.
The bottom line
E-E-A-T for AI search comes down to a question an engine can actually evaluate: is this content attributable to a real person at a real organization? Five blocks of JSON-LD — Organization, Person, Article, BreadcrumbList, and the references that connect them — turn your answer from "trust us" into a graph a machine can verify. The work is an afternoon; the maintenance is minutes a month.
If you want to see how your site's structure looks to AI engines right now, run a free AI visibility check — it takes about a minute and no account.
How visible is your site in AI search?
Check your AI visibility score in seconds. Free, no account needed.
Check your score